RandomWare: Evaluation Installation
Thank you for your interest
in RandomWare.
The evaluation features all
three RandomWare systems: Simple, Basic and Plus.
You can review all the
features available in the program using the included set of sample data.
The save function has been disconnected in the evaluation. Saving data
modifications is not possible. The evaluation is designed to showcase the
features of the program as well as the look and feel of navigating through the
system. All functions are featured.
The Help module provides detailed instructions and tutorials.
MicrosoftÆs Internet
Explorer (MSIE) version 4.0 or later is required for the help system to operate
correctly. If Help is still inaccessible, you may need to run hhupd.exe,
another Microsoft Update module. An
upgrade to MSIE version 5.01 and hhupd.exe are included on the disc and will be
found in the RandomWare folder after the installation is complete.
IMPORTANT!
When the program starts,
the help system is immediately displayed. If
you experience any trouble with the program startup, please be certain to check
your version of Microsoft Internet Explorer and run hhupd.exe as mention above.
First read After
Installation, then Getting Started.
Review the tutorials to become familiar with essential features of the
system.
If you need anything, please
let us know.
The installation topics can
be found on the web site page at: http://www.randomware.com/pages/support.html
The web site is located
at http://www.randomware.com.
From the web siteÆs home
page, select the Support Option at the top of the screen.
Enclosed is the RandomWare
installation CD.
Insert the CD into the drive
and start Windows Explorer.
To expose the files on the
CD, double click the icon symbol, which represents the CD drive on your
computer. Double click setup.exe where it appears in the panel
on the right side of the window, to start the installation.
The setup program will
install the system in the disk folder - C:\RandomWare.
If required, setup will allow
you to specify a different installation folder.
After the installation is
complete, the RandomWare Icon will appear on your desktop. Double click it to
start the program.
If you need additional
assistance, please visit the web site and review the General Installation Topics
found on the Support page.
Every effort is made to
continually improve the explanation of features available in RandomWare and add
additional tutorials. Check the web site often for new help modules. If the date
of the currently available module is later than yours, please, feel free to
download it.
The installation topics and
instructions to download a new help module can be found on the web site at: http://www.randomware.com/pages/support.html
Or, go to RandomWareÆs home page at: http://www.randomware.com,
and select the Support Option.
PLEASE NOTE:
Security Access Level I &
II:
Administrator Login ID:
Admin
User Login ID:
User
Default passwords, for both
administrator and user, (until
modified by the administrator) is Random
Capital ôRö, lower case
ôandomö
RandomWare
Installation: The Help System
The
RandomWare Help System is written using some of the most current technology from
Microsoft. Sometimes,
unfortunately, that means incompatibility problems with older systems.
Your
computer must have Microsoft Internet Explorer version 4.0, or later, installed,
or RandomWareÆs Help System may not function properly or may not be accessible
at all. Even if you do not access the Internet from the machine on which
RandomWare is installed, or you use another Internet browser, Microsoft's
Internet Explorer must be installed.
If
the help system is not accessible and Internet
Explorer version 4.0, or later, is installed, follow the instructions below:
Install
Internet Explorer, version 5.01. If
the help system is still, run the HTML update, hhupd.exe, from Microsoft.
This has fixed all the trouble we've seen with out of date versions of Internet
Explorer. If you still experience trouble, please contact us: Help@RandomWare.com
MicrosoftÆs
Internet Explorer 5.01 update and hhupd.exe are both included with the
installation. Both files are copied
into the installation folder. Using
Windows Explorer, expose the files in the RandomWare installation folder and
double click on ie5setup.exe to install MicrosoftÆs Internet Explorer upgrade
to version 5.01. Double click on
hhupd.exe to update other Internet modules and components.
Ie5setup.exe
updates your version of Microsoft Internet Explorer to 5.01
Hhupd.exe contains Microsoft
update modules and components.
RandomWare Installation:
Version 2.6
Program Fonts for the
Screen & Printing
You may need to set the print
fonts before you can properly print documents through RandomWare.
The default fonts do not seem to be active for all installations.
Print one of the sample Base Lists that accompany the program.
If it compares to the print samples included with the installation
document, your font settings do not need to be changed.
There are four print font
categories:
Primary Title
Secondary Title
Column Headings
Line Data
And two screen font
categories:
Data Input
Screen Text (data screen
column headings and titles)
When the font control dialog
is displayed, set all fonts to Arial, Regular, and Size 8 to insure that all
data fits on a page. Be certain the
option boxes for ôStrikeoutö and ôUnderlineö are not checked.
See the articles in the help
system under Printing, Fonts & Colors.
You will find articles there discussing the default fonts and the methods
by which fonts are specified and controlled. You only have to set the fonts
once. Once set, they remain well
maintained and need no further attention.
Please
Note:
If you downloaded the installation, printable examples are not included
with this document.
Color
Control û Setting the Display Properties for you Monitor
The pre-selected color
settings used by RandomWare will display best if the color palette for your
monitor is set to more than 256 colors. If more than 256 colors are not
available then refer to Help for assistance with color control.
A screen sample is available on the web site which illustrates what you
will see when the color palette is not correctly set.
Go to RandomWareÆs support page on the Internet at http://www.randomware.com/pages/support.html to see the
example.
|
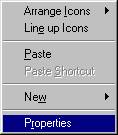
To easily access the
display control function right click the Mouse over
the ôDesktopö and click ôPropertiesö as shown on the right.
Or access display
control from the ôControl Panel.ö
Once the display
control dialog is displayed, select the ôSettingsö tab and a color
palette greater than 256.
|
|
|
Windows 95/98
will present a dialog box as below.
Some Helpful Tips
From the Directory Window
(RandomWare Plus+)
Right click on a
Group/Company Name for a Pop-Up Menu of Options.
From the pop-up menu, select
the Dialog Editor to easily access all the data fields associated with each
directory entry.
Double Click on a
Group/Company Name to open its Base List (Company Roster.)
Right click on a Pool-ID for
a Pop-Up Menu of Options.
Double click on a Pool-ID to
dynamically combine the member's lists into one for random selection.
From the Base List Window
Double click on a name to
access the Dialog Editor to easily access all the data fields for each employee
in the roster.
Double click on the Mode or
Category field to immediately access the Mode/Category manager or right click to
access the pop-up menu option that provides access the Mode/Category manager.
Double click on the Shift
field to immediately access the Shift manager or right click to access the
pop-up menu option that provides access the Shift manager.
From the History Data
Window
Double click on a name to
access the Dialog Editor to easily access all the donor sample data fields for
each entry in the history file.
Right click on any date in
the system to see its "Day of the Week"

Click on this question mark
wherever
it occurs. It provides a quick link to information about the current
window in which it is displayed. Updated
help systems are easily downloaded from the web site as the system expands to
provide greater depth to the help available.

Click on the ôShort Cutö symbol
for
a popup menu of relevant options available for the current data input item.

Click on the ôDrop Downö symbol
for
a list of selectable data items for the current input item.

Click on the ôSortö symbol
to
sort the column of text over which it appears.
Click the upper portion for an ascending sort (A-Z) and the lower section
for a descending sort (Z-A).
RandomWare: Quick Start

Click on this question mark
wherever
it occurs. It provides a quick link to information about the current
window in which it is displayed. Updated
help systems are easily downloaded from the web site as the system expands to
provide greater depth to the help available.

Click on the ôShort Cutö symbol
for
a popup menu of options available for the current input field.

Click on the
ôDrop Downö symbol
for
a list of selectable data items for the current input item.

Click on the ôSortö symbol
to
sort the column of text over which it appears.
Click the upper portion for an ascending sort (A-Z) and the lower section
for a descending sort (Z-A).
Random
selections are generated from data files referred to as Base Lists. These lists contain the names and identification numbers of
all personnel from which random selections are generated. You can manage as many lists as you require.
Develop
groups of lists through the directory facility (Randomware Plus+) or individual
lists through a separate management facility.
Please note, the facility to directly open Base Lists and History files
is, essentially, the Basic system.
A
Directory is list management module through which data is efficiently maintained
for:
- Client
Lists for TPAs (Third Party Administrators)
- Multiple
Departments, Companies, Groups, Organizations, etc.
- Pools
or Consortia
- Comprehensive
drug test data tracking for:
- Pre-Employment
testing.
- EAP
û Employee Assistance Programs.
- Random
testing & year to date percentage targeting.
- Periodic
random date generation for employee assistance programs, etc., etc.
RandomWare
provides extensive random selection control as well as comprehensive data
tracking for the drug testing industry.
The
evaluation program features the menu options for both the Plus+ and the Basic
versions of RandomWare. The Plus+
system has all the features found in the Basic version of the program.
If
you provide random selection as part of your drug testing service then maintain
a directory of companies for whom you provide testing.
Enter each company in a directory, and develop the list for each company
entered. Creating a consortium from
any number of companies becomes a trivial task with the directory facility and
the lists for each individual member can be managed quite easily.
If
your company manages its own drug testing program then maintain a directory of
the individual departments within your company or a directory for each facility
location. List each department in
the directory and develop each department's list.
If you provide random selections for your organization worldwide then
maintain a directory for each location.
A list will correspond to
each directory entry and is managed as an individual file.
Randomware can manage as many directory entries as you can manage. Each
directory entry corresponds to a list or roster of individuals.
The list file names are automatically assigned and the management of each
is performed through the directory by the group or company name.
From
the directory, simply double click on a group name and the program
presents a spreadsheet environment in which employee rosters (base lists) are
maintained.
Random
selections are saved to history files in which drug and alcohol testing data is
managed. Every data item required
for a comprehensive program of drug and alcohol testing is maintained from the
history data files. Data fields are
provided for Medical Review Officer (MRO) information, sample collection
information (CPC) and complete drug panel assessments. Refer to the sample
history files for examples of the data managed by the system.
Open
the sample directory, Dir_Sample. Once
displayed, double click on Acme Delivery to open its base list of personnel.
From the program module for base list management, choose the menu option Random
to generation random selections.
Click
on the text above any column of data to see how easily sorting is managed.
For example, move the mouse arrow until it hovers over the text ôLast
Nameö above the column where last names are entered, then click the left mouse
button to sort the list by last name. Click
again to reverse the sort. From the
base list, double click on any personnel entry to access the dialog editor from
which all data for an entry is maintained: name, address, phone numbers, notes,
comment, etc. Maintain only the
data relevant to your application of Randomware.
From
the directory window, right click on Acme Delivery and choose History to
open its history data file. Once
displayed, double click on any personnel entry to access the dialog editor from
which
all drug and alcohol testing data can be managed.
Once again, maintain only the data relevant to your application of
Randomware. Sort data in the same manner described above.
From
the ôHistory û Ledger Transfer Utilityö window, right click on an item in
the ôTrxö or ôLgrö column for access to the Ledger Utility control.
Note:
Trx is the Transfer pending request column while Trx indicates an item has
already been transferred to the general ledger.
To
open data files:
Press
one of the Open Directory buttons to open the previously accessed
directory, an existing directory or create yet another directory.
The first time you use the system, no ôpreviouslyö accessed directory
is defined. From the Open Dialog,
select the sample directory, Dir_Sample, for access to the directory management
environment. From the directory,
double click any entry to automatically open its corresponding base list of
personnel.
Right
click a directory item in the ôGroupö column to access the groupÆs random
selection history file where drug testing data is managed.
Open
new or existing individually managed base lists and history files with the Basic
system menu buttons. From the
subsequently displayed Open Dialog, select the sample base list, Sample, to
access the base list management environment or open the sample history file,
Sample, to preview the drug testing
data management features.
NOTE:
Randomware Basic does not feature the directory facility.
Lists are accessed and managed directly from the menu options.
Sorting
Easily
sort any column of data simply by clicking on the text about the column.
For example, sort a base list or roster of employees by last name simply
by clicking on the text ôLast Nameö where it appears at the top of the data
column. Click again to reverse the
sort. For more information about
sorting, read the help articles ôFile, Edit, Sort, Find.
From the help system, this article can be located by clicking the Contents
tab in the left panel of the help window where the help books are found.
Slide the horizontal scroll bar to position the books into view.
Base List
To
immediately access the complete personnel record editor from the base list
window, double click an employeeÆs name.
Right
click a name or employee I.D. to access the popup menu of options:
À
Personnel
Editor - or the complete record editor.
À
Transfer
personnel to EAP table.
À
Sort
Data: Ascending/Descending by column.
À
Randomly
sort the list.
À
Find:
Enter any text string or ID to immediately find an entry.
History
Table
Right
click a directory item in the ôGroupö column to access the groupÆs random
selection history table where drug and alcohol testing data is managed or open
the group history data table directly from the base list edit window.
From the history view window, double click an employeeÆs name to
immediately access the complete history data record editor.
Right
click a name or employee I.D. to access the popup menu of options:
- Test
Data Editor û or complete drug & alcohol data editor for donor sample
- Sort
Data: Ascending/Descending by column.
- Find
û Enter any text string or ID to immediately find an entry.